Last spring, a wonderful friend of mine 1,500 miles away had a baby. This photo-bomb is all about the baby-name letters that I made for awesome baby Landon. Enjoy! (If you're looking for a how-to, leave a message in the comments, and I'll give you a run down...)
Oct 5, 2011


Aug 25, 2011
hang.
To kick off my jump back into posting (here's where I apologize for being terrible about this for quite awhile now, but I promise, I've been busy!) I promised a "how-to" for the family-name sign I created for my cousin's (Mrs. Jahns!!) wedding shower. The last few months have been full of weddings and babies it seems, and rather than mail gift cards all over the country, it's much more fun (for me, anyways) to make things and pack them into big boxes. I have a few "catch-up" posts to write to get all of that up, and then I can move on to the fun things that my husband and I have been doing around the house that we just moved into. So, without further stalling, here it is.

Before- I picked up a cabinet door at our local Habitat for Humanity Re-store for about $5. Originally I wanted one that was a little more beat-up, but this one was in great shape, and the perfect canvas for text.

After finding a cabinet door, I measured the inner panel and created a document using Adobe Illustrator to match the size (though I'm sure Word would work fine...) I tweaked a little to get the text and embellishments laid out the way I wanted. Try a few different fonts, they change the style a lot!

Print your sign out, overlapping several pieces of paper if necessary. Make sure you like the way it looks and that the layout works well with the size of the door. Don't attach the paper yet...

When you're ready to get started, remove all of the old hardware and give the door a good scrub. Mine was a little dirty in the crevices, so I used soap and warm water to clean it up.

Attach picture hanging hardware on the back of the door. I used one of these jagged guys in each upper corner. They hammer in easily and they are very easy to get level. They also hold heavy things like cabinet doors well.

Flip your sign over. Trim a sheet of graphite paper to fit underneath your printed text. I taped off the sides first for the teal "frame" around the outside, then the graphite paper, then the text. Make sure that nothing is going to slip while you're working and that the graphite paper is the right side-down!

Carefully trace the outline of the text and anything else that you want to have on the door. I used a colored ball point pen so I could see what I had already traced. When you're finished, very carefully lift the paper off of the door. Make sure all the gaps in the trace are closed.

To paint, you can use brushes and craft paint, or anything that you like. I found Sharpie paint-pens in a ton of colors at Joann's Fabrics, and they were really easy to freehand with. Don't worry about covering all of the graphite or smearing it, after the paint dries you can clean it up with a pink pearl eraser and it won't hurt anything.

Let it dry overnight....

Mark the spots where you want to attach the new hardware. There are all sorts of things you could use for "hangers." Knobs, hooks, double hooks, etc... use your imagination! I left the handle on for a fun look. I liked that it still looked a little like a cabinet door, and I thought that it could maybe be used for a key hook or something... who knows!
Mar 13, 2011
bake.
I am so far behind on this.
That being said, the idea to "redesign the recipe" came from the witty people over at GOOD. I took a slightly different perspective than most of the other entrants, who seemed to focus on cooking for adults. Maybe because I already love to cook, when I read the original call for submissions [ here ], my thoughts immediately traveled to a young generation of cooks who knows little of being involved in the kitchen; much less in the preparation of their own meals. And how to get kiddos to cook? I imagine this way enticing with tasty ingredients (and results!), seducing with silliness, but still challenging with ordering directions and measuring.
You can see the brilliant submissions from artists / designers / foodies all over the place [ here ], and even vote for your favorite thru April 4th. I am still kicking myself for not making the submission deadline (especially since there were only 22 submissions!), but nevertheless, I had a blast playing and imagining the excitement of a 7 year-old boy reading a monster comic while enjoying his brownies.
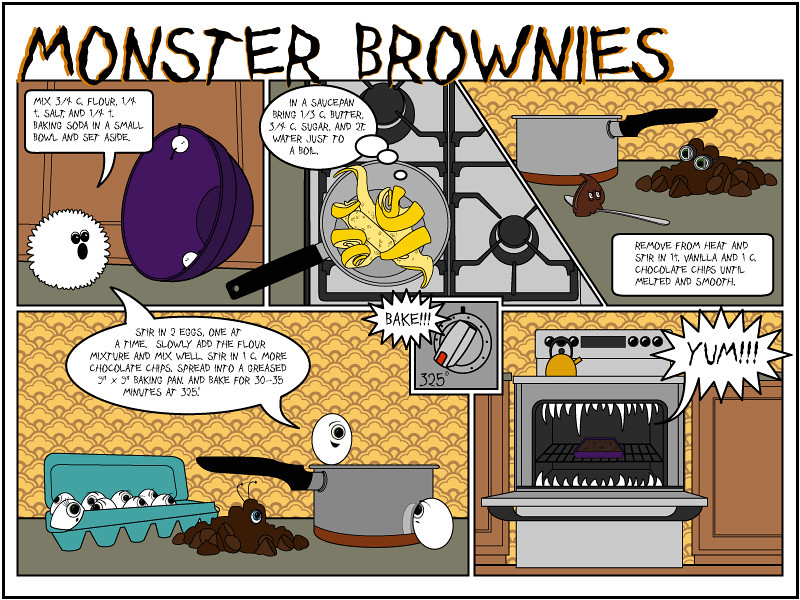
(If you love illustrated recipes as much as I do, have a look at "they draw & cook" a blog full of 'em!!)
Feb 22, 2011
tease.
Just a teaser (minus the text).... This is another fun little monster project that I'm working on for a competition of sorts. Hopefully it will be up by the end of the week, I have other things I want to do!

Feb 12, 2011
imagine.
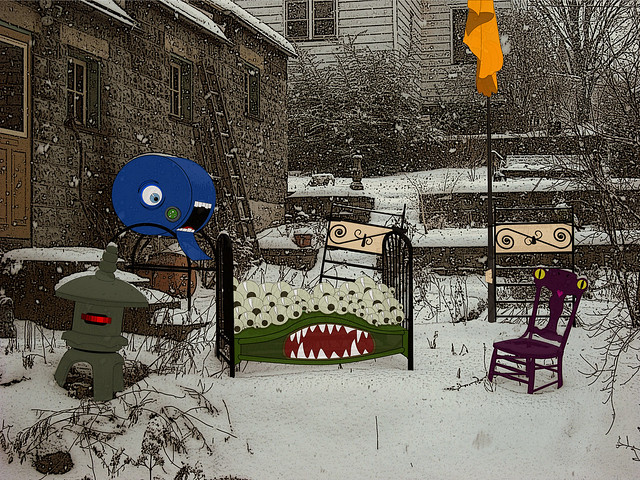
The first in what may turn into a series of "exercises." Since we moved into our little apartment, this is the view that greets me every morning. The random assortment of furniture conglomerated in the backyard can be nothing short of a supernatural "meeting of monsters." Or maybe it just makes work more fun to imagine so...
Despite our loving relationship, it's been a long time since I've used Adobe Illustrator to create anything, so don't hate on the skill level. This was more or less a warm-up to get back into the flow of shortcuts, manipulating, and layering that Illustrator supports. I even attempted to do a few things the hard way, just to make sure that I still knew how.
It's been awhile since I stretched my imagination and this really was a fun thing to play with. These old houses really are full of monsters.....
protect.
: A reto-post.
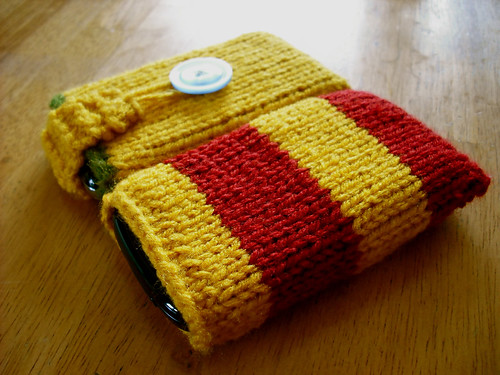
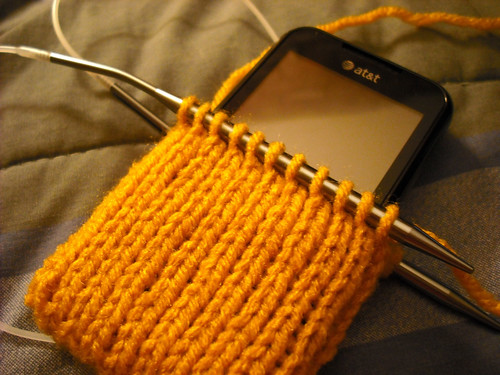
I knitted (purled, technically) these covers about a year ago. It was my first experience knitting in-the-round, and a happy accident. Since it's snowing very hard today, and I'm contemplating which flavor of tea I'm in the mood for, another knit project seems appropriate. I have a stash of old projects that I'm finding as I clean off my hard drive, and I think I'll try and spread them out a bit as creativity is moving slowly. I can't wait for this bout of forced hibernation to come to an end!
Feb 10, 2011
knit.
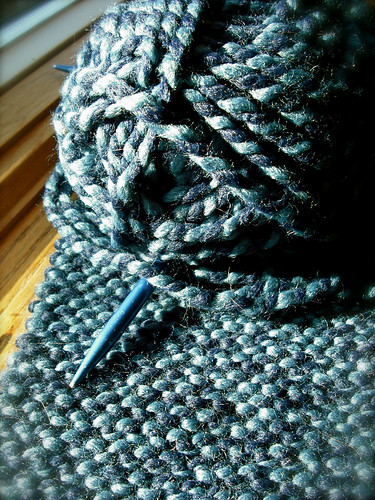
Just the beginnings of a scarf I'm working on... One of the first stores I visited when we moved was Joann's fabrics, to get new buttons for a coat (necessary.) Obviously, I couldn't pass this up, It's navy and sky blue, wool, and super-chunky and it was on sale. I'm knitting it with 10 1/2's. I've never used the super-thick yarn before, but I'm loving it because it makes it go so fast!
I'm also trying to teach myself to handle ribbing better. I get all lost in the yarn in front/ yarn in back thing, but it's coming along. Soon I'll be able to attempt my leg warmers (hah!) and the dorky dog sweater that's going to make Turk into a hipster-dog. Ha ha.
Jan 28, 2011
embark.
A short update:
The last 6 months have flown by!! As 2011 begins, we find ourselves 1,500 miles away from 2010, embarking on a new chapter of life. About a month ago, we were offered a job in central Pennsylvania (seemingly in answer to our deep desire to adventure outside of Texas for a bit.) Within 5 days, we were packed tight into two vehicles driving across the United States. We left most of our belongings in a storage unit in Texas, and we are now exploring this corner of the world, just us and the dog.
Since I have traded my wide-open work space for a four-room apartment on the second story of an old victorian home, the size of projects will definitely be decreasing. I think this is a good opportunity to push my limits and re-discover the vast boundaries of digital media. I have a few projects in mind, but it may take a while before I feel comfortable enough to share. On the flip side however, the never-ending snow on the east coast this winter is creating an awesome background for cozy knitting projects. More to come soon...
Jul 30, 2010
forge.
Meet our newest addition; the coal forge. Now technically, I shouldn't be posting this here, but I just couldn't help it. It's really my husbands toy; I've never forged anything in my life, (though I'm hoping to learn now...) but it's such a neat thing, and it's a part of my family history.
Since we moved in October, my husband has been talking about the forge. It was sitting among my grandpa's clutter, that my grandma just adores, might I add, and I'm sure it was just calling out to him "please, please, take me home!" A couple of weeks ago he finally got his wish. We now have added to the rest of our creative endeavors a Champion Blower & Forge Co. Model # 400 coal forge. It's pretty old... what I'm assuming are the patent dates read "April 15, 1902 and July 30, 1901." I believe it was probably my great-grandfathers, if not my great-great-grandfathers. Neat, right?! But despite it's age, it still works like a dream. When he really got it cranking, I got some pretty great pictures of the sparks flying. So far, he's been experimenting with flattening a railroad spike, to get the feel of things, and hammering on an old piece of i-beam. If you've got an anvil just lying around, or know someone who does, we'd be happy to take it off their hands!
Jul 25, 2010
sit.
New project: Chairs!
If you remember, a while back, I posted about the two part-er table project. Step one was the napkin rings, while step two was fixing up the set of 4 chairs that goes with the table. I'm finally getting around to the second part.
Since there are 4 chairs, all in different stages of being, we'll separate them. A and B used to be finished, until the puppy decided to teethe all over B's legs. So, A gets a few touch-ups and B gets all kinds of sanding, and a few more touch-ups. C is half-way there. Once upon a time, when I was home from school, I decided that I wanted four chairs in my efficiency apartment rather than just two. So I dragged C down from the attic, and sanded away. Then I got tired and abandoned it. Now C just looks like a molted green and yellow mess. And D. D is officially in "before" state. So there's your comparison...
So far, A and B are touched up, re-glued and happy, and after a long afternoon of work, C only needs one or two more coats of fresh paint. D is re-glued and slightly stripped. D needs some help.
Hopefully this will be just a two-update process. We'll see!
Jul 11, 2010
stain.
After forever, the desk is finally finished! Thank goodness, because I really don't get anything done with my computer set up in the living room; I'm ready to move back to my kitchen corner!
All that's lacking now is the hardware, which I'll add in the morning when the top coat has completely dried. After all of the hard work, I'm really proud of myself. For anyone out there who has qualms about re-finishing furniture, don't worry! It's really not as scary as I thought it would be, though you should be ready to put in a lot of hours with some sand paper if the finish is in bad shape. The staining went very smoothly, I used a rag to rub the stain into the wood and just let it dry. For the varnish, I used a foam brush (grand total of 96 cents at home depot) and made very long strokes.
I think, in review, that the color was a good choice, even though it still doesn't match much of our furniture. It was a cleaner version of the original color, and it stays true to the natural wood, which I believe is pecan. I can't wait to get my hands on the other pieces in the set someday so that I can clean them up too! What a great bedroom set it will make!
Jun 27, 2010
grind.
Just checking in... It's job hunting week and that means that from about 6:30 am 'till I fall asleep I'm scouring the web for my new home. As an update, we're looking to get out of Texas (fingers crossed) just for the fun of it. We're really (really) hoping for Boulder/ Denver area. We'd settle for Phoenix / Dallas / Austin, or gee, if we had to, San Francisco / Portland / Seattle or overseas. (: It's a fun time in life where the doors are wide open, we have no ties and we can just see what happens. Or, worst case scenario, doesn't happen. Then we end up right where we're at now moving just a hop down the street. Ugh. Please no. So, shameless plea, if you know of anything even remotely interesting going on in these areas job-wise for an architect or a ceramic artist please contact me! Thanks!
For now, back to the grind......
Jun 20, 2010
strip.
Since my bike is nearly finished, it's time for a new project!
My husband and I are just starting out, and there are times (with much thanks to our families!) that our hodgepodge of donated furniture feels a little like a goodwill showroom. So, my plan of attack is to re-finish a lot of the big stuff to match, such as the bookshelves, a desk, a drafting table we've acquired, and a set of chairs. First up: the desk. My husband had this desk in his bedroom in the "bachelor pad" when he lived with roommates. It's a great piece of furniture, and recently I learned that on top of that, it's a family heirloom!!! Since I found out, I've been trying to learn a little more of the history of the piece, since their family has a few more pieces belonging to the set that I'd like to try and clean up.
But it's really much much more than that... "Olive & Myers Manufacturing Company" was a mattress and furniture manufacturer founded in downtown Dallas in, I believe, 1900. At that time, one of the founders, also the vice president of the company, was Horace Elton (aka H. E.) Spalti. This guy was my husband's great-great-grandfather!! The company in itself has an amazing history. The headquarters were located in a very prominent building located in downtown Dallas; today it is know as 2220 Canton Lofts. H. E. Spalti later became the president of the company, and in the mid-50's Olive & Myers officially merged with a Houston manufacturing company, Myers & Spalti, to become Olive, Myers, & Spalti. My husband's great-grandfather, Horace Duncan (aka H. D.) Spalti became president. Vera B. Spalti, H. D.'s wife, was a name that I was already familiar with; my husband proposed with her engagement ring, and I wear it every day. (:
Here are a couple of pictures of the historic part, and a bunch of the beginnings of the project:
Also, here are some of the links that I found during my "google-fest" on Olive & Myers:
Location of the old warehouse complex in Dallas, Tx:
build.
Here it is! The bike is back together! Not by any means ride-able yet, but not too much left before it will be! Re-greased/ oiled the parts, got everything back on the way it came off, and I think that everything works.... List of things to do before I can ride: new tubes and tires, new chain, and a little work on the shifters, also need some handlebar tape; I'm thinking yellow to match. Take a look:
Jun 14, 2010
shift.
One step closer, and if things go right I'll be putting the bike back together in the morning! Even though I finished the shifters and the brakes last Thursday, we've been away again and I'm just now getting the chance to post...
Both systems went smoothly, even though they were the parts I was most nervous about. I've never done much mechanical work, and I thought a bike was a better place to start than leaving pieces of my truck all over the place. Turns out I was probably right. With a little help from Zinn, I was able to navigate both systems pretty easily and really, they're both fairly self-evident once you get the covers off and the basic nuts and bolts out of the way. I was proud to unravel their mysteries. Hah. A few pictures here:
Jun 8, 2010
clean.
Today, I cleaned. And scrubbed. And brushed. Anything and everything to get all of the pieces and parts ready to toss back onto the frame. I started with a daunting box full of non-sense, and ended with two very shiny wheels, very shiny handlebars, "like new" pedals, and a clean bottom bracket. Not to mention that I survived a rear wheel crisis. I think it was a pretty productive day...
The crisis was the moment when I realized that trying to take the freewheel off to clean it was a mistake. Little did I know that A. removing the freewheel just about always ends in a complete overhaul of the rear component, and B. you need a special tool to even remove a freewheel. One that I do not possess. Loosening the nuts on the ends will only result in a really cool long piece sliding out of the middle of the entire wheel, and *hey* a neat little handful of ball bearings that no matter how you balance the bike, smash your fingers, or poke with needle nose pliers, will absolutely NOT fit back in the way they seem to have started. So, about an hour, and lots of panicking later, the crisis was averted with only two little ball bearings left over... Who needed those two anyways??
[note: this will probably be one of those "hindsight" moments later. And no, you can't say "I told you so," because I already beat you to it.]
At the end of the day I was left with things to do: figure out the brakes and shifting systems, clean the seat and kickstand, and things to get: A new chain (mine's shot...) and new tubes and tires. The (very) old ones seem to have been whitewall.... What do you think? Should I go for it? I got a funny feeling thinking about cruising around with the whitewalls and chrome popping against the purple frame, I'm just not too sure.
Jun 6, 2010
unwrap.
The painting is finally finished!! There was nothing more satisfying (except maybe when I take that first cruise) than peeling all of the tape off for the last time. (: After taping off yellow... then white... then black... then the text... then all of it... Hah. It felt great to spray the last coat of gloss on wildly.
The solid color stripes and bands were actually pretty easy... I covered the entire bike with newspaper to keep from making a mess, then just adjusted the taped off parts as I needed to. The only part I ran into a bit of trouble with was the text. I had printed stencils onto card stock, and I never even thought about the rigidity of the paper. The little bits inside the letters wouldn't conform to the bike... duh. So, my solution was to trace the text onto layered painter's tape and then cut out the letters with an exacto. Worked like a charm! See??
May 26, 2010
sort.
On another note, this the box of stuff that I have to sort through to get the "project portfolio" portion of my site going... dating from fall 2003... yep. The goal is one project a day until they're all finished. Maybe. I'm having trouble finding any documentation from a couple of projects (and, no, it doesn't matter that they drilled it into us to document EVERYTHING and save it all in at least two places.....) but I know it's out there. Sigh. [ If anyone needs something from project, let me know... Pretty sure I keep everything.]

go.
Sun! Finally, a day off where the sun is out! Though, technically, that first part isn't really true... We were planning on heading out of town to get some work done, but it's just too gorgeous outside. So, even though our estimated departure time was, oh, about now, I dragged all of the bike non-sense out of the shed. I'm currently in between coats of white on the stripes, then comes the black, some sanding (for sure!) and the text... then a final glossy coat and a week to get all the parts up to par. If the weather will cooperate, there's a light at the end of the tunnel! I could be cruising by mid-June. Pshhh... dreaming again...
p.s.- I'm still alive, that was really the reason for this post. Hah. A house guest, a rehearsal, a wedding, a handful of thunderstorms, and hundreds of dollars later... I'm still alive...
May 19, 2010
spin.
After about a week of rain, I couldn't take it anymore... I had to find something to do! While wandering around the house after about 3 cups of coffee, I decided that we needed a "real" dining area. Before yesterday, our table was a catch-all for junk. I only have 2 of the 4 chairs that match (the other 2 are half-sanded and stashed in my parent's attic somewhere...) and the cats just can't keep their lazy butts off the table. We received place mats and napkins for our wedding that hadn't even been de-tagged. So. Goal: Phase one, clear off the table, wash and iron everything, and find some sort of "scheme" for a centerpiece and maybe some napkin rings (which I am not really a fan of... hence the challenge.) Phase two, find the other two chairs, re-glue, and paint all four...
Now, I already had a good centerpiece. A small tray with glass votive holders and a few red candles to pop into it. Napkin rings on the other hand were the challenge. After a little internet research on "non-ugly" rings I decided I wanted to try and make some. I decided on twisted wire and beads because they wouldn't be overpowering (not to mention silly looking) and they would be a quick project.... little did I know.
Now, side note: my husband is a bona-fide artist. Degree and all. We have the supplies to make any 3D form of art imaginable. While digging through our "supply wall," I stumbled on a handful of glass beads left over from some endeavor of his. Perfect! When I left them out on the table though, I began a revolution... He was inspired. Instead of using found beads, I was going to learn to make my own! Yay!
Below are pictures and a little further explanation of the process, but in short, it involves fire, molten glass, and a lot of patience. And the end product of "phase one" is pretty nice, if I'm allowed to say that... See for yourself:
And a little more about the process here.
Subscribe to:
Posts (Atom)